Showing posts with label salad.. Show all posts

Monday, June 11, 2012

Grilled Tuna

There is nothing better than tuna on the grill, or at least that is my opinion.  The tuna we got came from SeaBear who have excellent seafood.  As I was making part of this meal I told my husband that I don't know how this experiment will turn out, his comment was your experiments always turn out great.  I have to say he was right.

Grilled Tuna
2 tuna steaks
juice from 1 lemon
1/2 cup tamari (soy sauce)
2 cloves garlic crushed
Combine lemon juice, tamari and garlic.  Place tuna in a container and add liquid.  Marinate for about 30 minutes at room temperature.  Heat grill to 400 degrees Fahrenheit.  Place tuna on grill and cook for no more than 4 minutes per side.  This depends a lot on how you like your tuna cooked.  Our tuna was rather thick and we like our tuna more on the rare side.

Fried Buckwheat Soba Noodles with Mixed Mushrooms
I had a package of soba noodles and decided that this would be our side dish.  Sometimes it is a matter of digging through the pantry to see what you have and what you want to cook.  I try to plan meals out so that I have the ingredients on hand but sometimes that doesn't necessarily work.
Cook 1 package of soba noodles to package directions
1 package of frozen mixed mushrooms, thawed
Fish Sauce
In a skillet add a little bit of ghee, let melt over medium heat.  Add mushrooms and cook slightly.  Add cooked soba noodles.  Toss noodles with mushrooms.  Continue to cook.  Add a little bit of fish sauce (this will add a nice flavor to the noodles).  Continue to cook, turning constantly until a few noodles become crispy.  Serve with tuna.

Along with the tuna we had a side salad.  The salad consisted of salad greens we picked up at the farmers market on Saturday.  A fresh diced tomato and fresh feta cheese was added.


On the bottom part of the picture is a breakfast radish from our garden.  My husband is a big fan of radishes, I am not. 

Friday, April 6, 2012

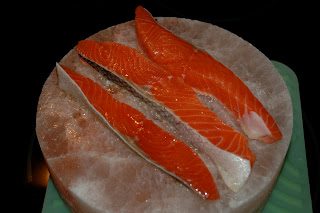
Salmon Cooked on a Himalayan Sea Salt Plank

When I did a order last week for seafood through SeaBear I saw this really cool cooking tool called a Himalayan Sea Salt Plank.  I was intrigued by how you cooked using this huge chunk of salt.  So I bought one and tried it for the first time tonight.

Here is what I did:
While leaving the skin on, cut salmon fillet into strips approximately ½” wide. Set aside on a cold platter for cooking later.   Brush each side of the salmon with olive oil.
Properly heating your salt plank will take approximately an hour or so.  Place your dry salt slab into a cold oven and turn the heat to 250 degrees Fahrenheit. When the oven has reached 250 degrees, carefully remove the salt slab and let cool for about 30 minutes on a stove top, or other safe area. Then return it to the oven and set the temperature for 400 to 450 degrees Fahrenheit  for 30-35 minutes. The heat will distribute slowly and evenly throughout.  Remove plank from oven, place on a safe surface.  Place salmon strip onto plank.  It will take only a couple of minutes each side for the salmon to cook.  Here is a cool video so that you can see how the salmon is cooked.  


I made a herb aioli to go along with the cooked salmon.  I didn't have any fresh herbs available so I used dried.  You only want to use a little bit of each and make it to taste.
It consisted of homemade mayonnaise, dill weed, parsley, thyme, tarragon, cilantro, fresh ground pepper,  little bit of lemon juice and a splash of Tabasco sauce.


Along with this we served couscous and a small side salad.  This kept the meal nice and light.
Salmon while on the sea salt plank beginning to cook


Tuesday, March 27, 2012

Grilled Salmon with Grilled Sweet Potatoes

I don't know what the deal is but I am trying to inspire myself for dinners and am not having much luck.  I guess I really haven't gotten back in the true groove of things since we returned from vacation.  I promise to do better, soon, very soon!  Tonight I decided to do salmon on the grill.

Grilled Salmon
Take 2 filets of salmon (we have wild Alaskan Coho Salmon from SeaBear), drizzle with extra virgin olive oil, sprinkle with salt, pepper and I have a little of this herb mixture that is made for fish (contains: lemon peel, garlic, parsley, white pepper, chives, basil, cayenne).  Grill salmon over medium heat skin side up for 5 minutes, flip over and grill for 5 minutes.  Remove from heat.

Grilled Sweet Potatoes with Cinnamon Sugar
Take 1 Japanese sweet potato (Japanese Sweet Potatoes are purple on the outside and white on the inside.  They are not the orange color you associate with American sweet potatoes), slice super thin (I used a mandolin, no not the musical instrument, but one of those slicers that you can slice stuff really thin).  Place slices onto a piece of foil, overlap the slices slightly.  Add a couple of slices of butter; place the slices throughout the top of the sweet potato slices.  Sprinkle the top with a mixture of cinnamon and sugar (I used regular white sugar).  Place another piece of foil on top and turn up the ends so that you are sealing the potatoes into a foil packet.  Place the packet onto the grill over high heat, cook for 5 minutes, turn packet over and cook for another 5 minutes.  Removing to warming rack for 10 minutes.  (Once you remove the packet to the rack, place salmon onto the grill.  Remove from heat.

We had a small side salad to go along with dinner tonight.


Monday, February 27, 2012

Lunch in a Jar

My daughter gave me this fantastic idea for taking lunch to work.  Her and her co-workers do this all the time.  After she told me about it I thought what a brilliant idea.  Here's the scoop...

You can make a salad in a mason jar.  I used a pint sized jar.  It is really cool once you think about how it is constructed.  You can add any ingredients you want but you should start and finish with the same items.  What you will be doing is making a salad upside down.

Here is what you need to do:  For the bottom of the jar, add your favorite dressing.  Next layer any and all ingredients you want.  I added leftover tenderloin steak from the other night, cheese, dried cranberries, tomatoes and then end with lettuce.

You want the lettuce as the last thing that you add.  I am told that you can make lunch for the whole week this way (so essentially you can make a week's worth of lunch on Sunday to last from Monday to Friday).  It will keep and the lettuce won't wilt.  I was very delighted to be able to reach in the refrigerator this morning and grab lunch.  Once you are ready to have lunch, drop the ingredients out onto a plate.  You can try so many different things to take for lunch this way.  Also, you could easily use another size jar to make a larger salad or to have more room.


As you can see it turns into a large sized salad.  I apologize for the not so great pictures, these were taken with my phone.

This post was shared on The Healthy Home Economist Monday Mania 2/27/2012

Wednesday, January 4, 2012

Honey Glazed Chicken with Rice

I dug for a chicken recipe out of my many cookbooks for tonight's dinner.  I knew I wanted something quick, easy and something that can be baked in an oven.

I pulled this recipe from The Grassfed Gourmet Cookbook.  Here is the recipe:

3/4 cup flour **
1-1/2 teaspoons coarse salt **
3/4 teaspoon fresh ground pepper
1 3-5 pound pastured chicken, cut up **
4 tablespoons unsalted butter, melted
1/4 cup dark brown sugar
1/4 cup honey
1/4 cup fresh lemon juice
1 tablespoon soy sauce (I use wheat free, reduced sodium tamari)
1-1/2 teaspoons curry powder

Preheat oven to 350 degree Fahrenheit
Combine flour, salt and pepper in a medium bowl.  Rinse the chicken, pat dry with paper towels, and then dip the chicken into the flour mixture, turning until they are thoroughly coated.  Place on a rack, and set aside.
Pour the melted butter into a 9 x 13 inch baking pan.  Add the chicken pieces, turning until they are coated with the butter.  Bake, uncovered, for 30 minutes. **
Mix together the brown sugar, honey, lemon juice, soy sauce, and curry powder.  Pour over chicken, and bake for 45 minutes longer **, basting occasionally with the pan drippings.

**  Here are my notes for this recipe.  I used boneless pastured chicken breasts instead of the whole cut up chicken.  Because I was using just chicken breasts I didn't need as much flour and knew that I didn't need nearly that much salt.  So adjust the salt and flour to suit your tastes.  In regard to baking the chicken I did the first bake for 20 minutes and then for 25 minutes after the sauce was poured on.   The flavor of the sauce is wonderful and I could almost spoon out what was left and eat it by itself.  I think the next time I make this recipe I am going to add pineapple slices to the bottom of the pan.  I believe that the flavors in the sauce will compliment the pineapple.

I served the chicken with a side of basmati rice.  For 2-3 servings you need
1/2 cup rice, 3/4 cup water and 1-1/2 teaspoons of butter.  Combine rice, water and butter in a pot with tight fitting lid.  Bring to a boil.  Stir once.  Cover with lid.  Reduce heat to a simmer and cook for 20 minutes.  Remove from heat, let stand in covered pot for 10 minutes.  Fluff with fork and serve.


 I also served this with a salad which was our main vegetable for the meal.  The salad was greens, tomato, green peppers, carrots and dried cranberries.  It was served with a balsamic vinegar, olive oil dressing.